 View on GitHub
 Install in Dash
 Getting started guide Reference
Getting started guide
Welcome to the Hub Framework getting started guide! This guide aims to help introduce you to the concepts of the framework, and give you a step-by-step guide to building your first dynamic, component-driven view.
Note that this guide does not involve setting up the Hub Framework in your application - for that, see the setup guide. This guide requires an application already set up with the Hub Framework, if you don’t have your own - you can use the demo app that is included in the Hub Framework repo.
In this guide, we’ll be building a new feature called Cities
, which will use row & image components to display various cities from around the world. The feature will have only one view, and we’ll be building both the content and the components from scratch. The end result will look like this:
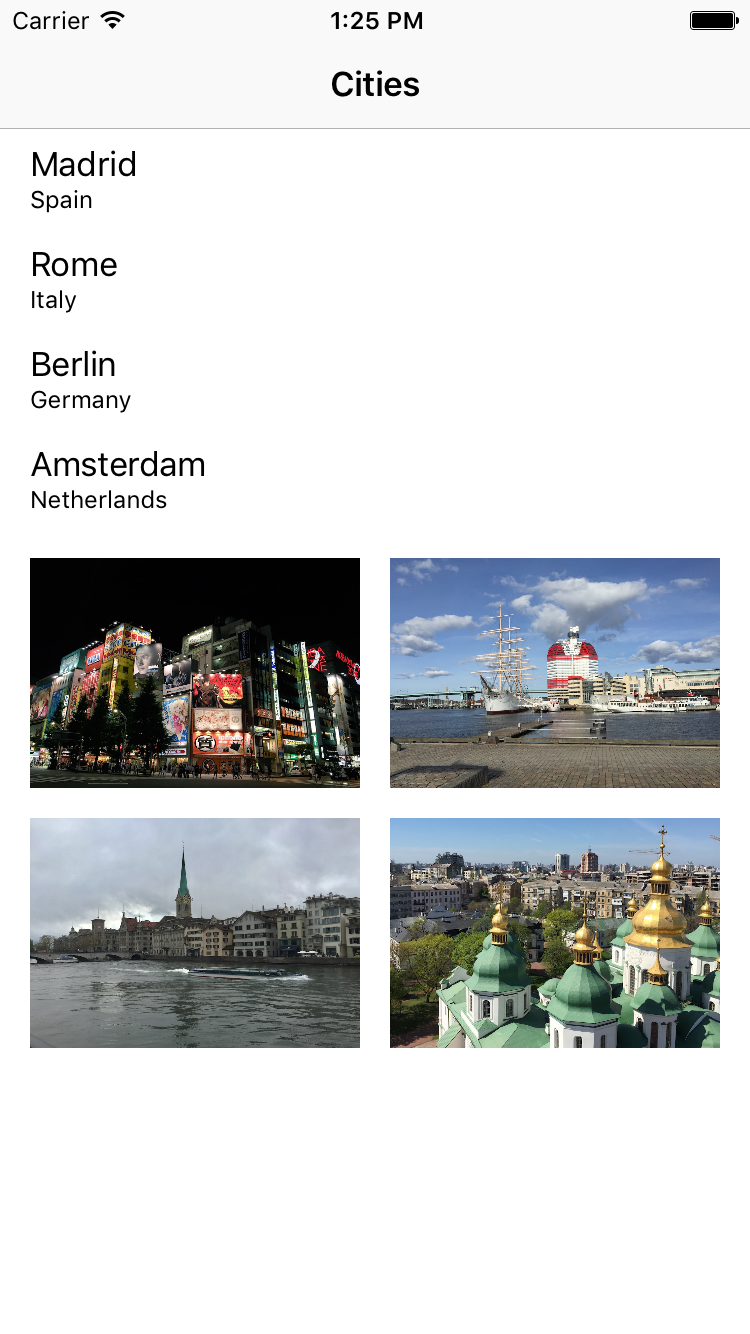
Table of contents
- Setting up a feature
- Creating a content operation
- Creating a content operation factory
- Opening the view
- Creating a row component
- Creating a component factory
- Using your new row component
- Adding multiple row components to the view
- Creating an image component
- Adding image components through JSON
- The final view
Setting up a feature
The first thing you’ll need to do is to setup a feature for your view. A feature is a logical group of views that share the same setup, such as content loading & action handling code.
To setup a feature, you use HUBFeatureRegistry, which is available on the application’s HUBManager instance. You call the following API:
[featureRegistry registerFeatureWithIdentifier:@"cities"
                             viewURIPredicate:viewURIPredicate
                                        title:NSLocalizedString(@"Cities", @"Title of the Cities feature")
                    contentOperationFactories:@[]
                          contentReloadPolicy:nil
                   customJSONSchemaIdentifier:nil
                                actionHandler:nil
                  viewControllerScrollHandler:nil];
Let’s go through the first set of parameters:
identifier: The identifier of your feature. This is used internally in the Hub Framework to track the feature, and must be globally unique. It’s usually a good idea to keep this human-readable, since it’s a good identifier to use for any log messages that you might generate for your feature.
viewURIPredicate: A predicate that will be used to determine whether a given view URI belongs to our feature. The Hub Framework uses a URI-based navigation system to go between different views - so we’ll create a predicate that matches the view URIs that we want to respond to. In this case, our feature will only contain a single view, with the view URI cities:overview, so we’ll create the following view URI predicate to match it:
objective-c
NSURL *viewURI = [NSURL URLWithString:@"cities:overview"];
HUBViewURIPredicate *viewURIPredicate = [HUBViewURIPredicate predicateWithViewURI:viewURI];
title: A localized title for our feature. We will use this later in our content operation to display a navigation bar, but it can also be used for shared content operations that add content based on the feature title.
contentOperationFactories: The factories that will create content operations that build the content of our view. For now, we’ll just pass an empty array, since we first have to create our content operation & factory (note that passing an empty array is actually a fatal error, so it’s important that we go back and change this after we’ve written our content code).
We’ll ignore the rest of the parameters for now, since they connect to optional APIs that can be used to further tweak your feature’s various behaviors. Let’s jump over to creating our content operation.
Creating a content operation
A content operation takes part in the content loading chain for a view and is responsible for building part of (or all) content of a view. If you haven’t already, it’s recommended to skim through the content programming guide before you continue, as it will help you get a base understanding of content operations and how they work.
You make a content operation by conforming to the HUBContentOperation protocol in a new class, and implementing the single method that it requires:
@interface SPTCitiesContentOperation : NSObject <HUBContentOperation>

@end
@implementation SPTCitiesContentOperation

@synthesize delegate = _delegate;

- (void)performForViewURI:(NSURL *)viewURI
              featureInfo:(id<HUBFeatureInfo>)featureInfo
        connectivityState:(HUBConnectivityState)connectivityState
         viewModelBuilder:(id<HUBViewModelBuilder>)viewModelBuilder
            previousError:(nullable NSError *)previousError
{
    // This is where we'll create our content

    [self.delegate contentOperationDidFinish:self];
}

@end
Now let’s begin building our content - starting with the navigation bar title. In our content operation, we get passed a HUBFeatureInfo object containing information about our feature. We can use this object to obtain the localized title that we passed when setting up our feature, and then assign it as the view’s navigation bar title, using the HUBViewModelBuilder that we are also passed. We’ll add one line of code to do that to our content operation’s perform method:
- (void)performForViewURI:(NSURL *)viewURI
              featureInfo:(id<HUBFeatureInfo>)featureInfo
        connectivityState:(HUBConnectivityState)connectivityState
         viewModelBuilder:(id<HUBViewModelBuilder>)viewModelBuilder
            previousError:(nullable NSError *)previousError
{
    viewModelBuilder.navigationBarTitle = featureInfo.title;
    [self.delegate contentOperationDidFinish:self];
}
Let’s leave our content operation like this for now, and make a factory that will create instances of it.
Creating a content operation factory
The Hub Framework makes heavy use of the factory pattern throughout most APIs, to avoid that the same object/state gets used in multiple views - which is a very common source of bugs. So for every feature, we’ll need a content operation factory that will create the operations that we’ll use for every view that will be created for the feature.
To create a content operation factory, we create a new class and conform to HUBContentOperationFactory. Then, when we’re asked to create content operations for a given view, we return an instance of the SPTCitiesContentOperation we just created:
@interface SPTCitiesContentOperationFactory : NSObject <HUBContentOperationFactory>

@end
@implementation SPTCitiesContentOperationFactory

- (NSArray<id<HUBContentOperation>> *)createContentOperationsForViewURI:(NSURL *)viewURI
{
    return @[[SPTCitiesContentOperation new]];
}

@end
We’re now ready to go back to our feature registration code and update it to include our new content operation factory:
[featureRegistry registerFeatureWithIdentifier:@"cities"
                             viewURIPredicate:viewURIPredicate
                                        title:NSLocalizedString(@"Cities", @"Title of the Cities feature")
                    contentOperationFactories:@[[SPTCitiesContentOperationFactory new]]
                          contentReloadPolicy:nil
                   customJSONSchemaIdentifier:nil
                                actionHandler:nil
                  viewControllerScrollHandler:nil];
Opening the view
You’re now ready to open your view for the very first time. Although it will be very empty - it will show your feature’s title (Cities
) in the navigation bar, and enables you to verify that you’ve successfully completed all steps up until now.
To open your view, make the app that you’re working in open the URI cities:overview. How to do this depends on how your app is configured.
If you’re working on the Spotify app, you can go to Search and paste the URI into the search field and press Enter.
If you’re working in the demo app included in the Hub Framework repo, you can easily add the following lines to the RootContentOperation perform(forViewURI:featureInfo:connectivityState:viewModelBuilder:previousError:) method:
let citiesRowBuilder = viewModelBuilder.builderForBodyComponentModel(withIdentifier: "cities")
citiesRowBuilder.title = "Cities"
citiesRowBuilder.subtitle = "A feature that renders beautiful cities"
citiesRowBuilder.targetBuilder.uri = URL(viewURI: "cities:overview")
If your app doesn’t include an easy way to open any given URI, you can create and push a view controller onto your navigation controller using HUBViewControllerFactory, available on HUBManager:
NSURL *viewURI = [NSURL URLWithString:@"cities:overview"];
UIViewController *viewController = [viewControllerFactory createViewControllerForViewURI:viewURI];
[navigationController pushViewController:viewController animated:NO];
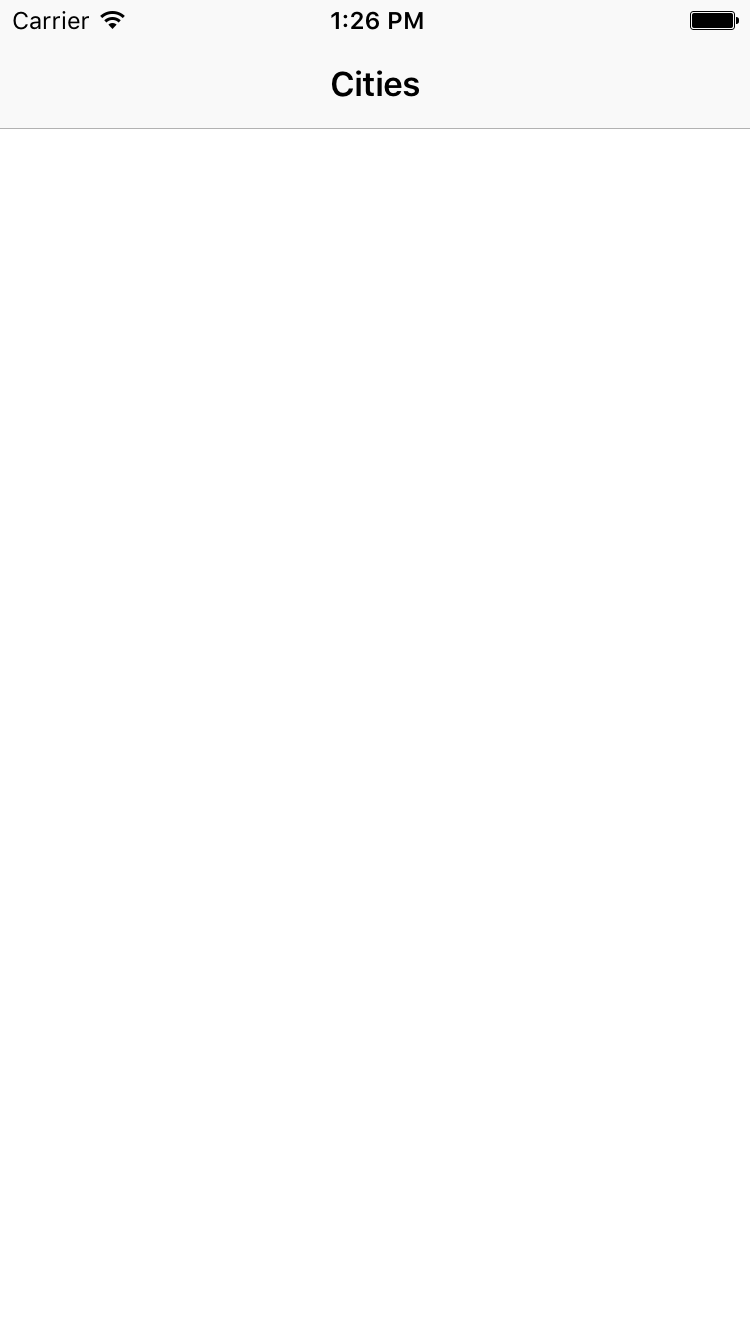
You should now be able to see an empty view with the navigation bar title Cities
, like this:
Creating a row component
Let’s now jump over to creating the components that we’ll be rendering in our UI. As you can see in the image at the top of this guide, we’ll be using two different kinds of components - one rendering as a row and one that renders an image.
Let’s start with the row one. If you haven’t already - it’s recommended that you take a look at the component programming guide before continuing, as it will help you gain a basic understanding of how components work.
Components are the visual building blocks of any view that is using the Hub Framework. To define one, you create a new class and conform to the HUBComponent protocol.
@interface SPTCitiesRowComponent : NSObject <HUBComponent>

@end
Let’s implement the methods in the HUBComponent protocol one by one and walk through what they do.
Loading the component’s view
The first two things we’ll implement is the loadView method, as well as @synthesizing a backing view property for storing our view.
@implementation SPTCitiesRowComponent

@synthesize view = _view;

- (void)loadView
{
    self.view = [[UITableViewCell alloc] initWithStyle:UITableViewCellStyleSubtitle
                                       reuseIdentifier:nil];
}

@end
You’re free to use any UIView for rendering a component. Since we want our row to look like standard iOS table view cells, we’ll use a UITableViewCell as our view.
As you can see above, we’ve taken quite a lot of inspiration from UIViewController when designing how HUBComponent implementations manage their view. Components are basically lightweight view controllers that fills the same role in an MVC triangle between a UIView and a HUBComponentModel.
Defining layout for the component
Normally, when deciding how a view acts in terms of layout, you’d set up Auto Layout constraints or override layoutSubviews in the view’s superview. However, in the Hub Framework, we want components to be as reusable as possible - and really decoupled from the context that they’re used in. We also want layout to be consistent throughout an application, and minimize the code duplication needed to setup various layouts.
That means that we have to do layout a bit differently, using something called Layout Traits. To learn more about layout traits and how the framework computes layout for components, it’s recommended that you read through the Layout Programming Guide before continuing.
Layout traits are a more abstract way of defining layout. Instead of specifying absolute margins between elements, you are instead specifying how a component should behave in terms of layout. For our row component, we want it to stretch the entire view, and we want it to be stacked together with other rows, without any margin in between. So we’ll use the following 2 layout traits:
- (NSSet<HUBComponentLayoutTrait *> *)layoutTraits
{
    return [NSSet setWithObjects:HUBComponentLayoutTraitFullWidth, HUBComponentLayoutTraitStackable, nil];
}
The other piece of the layout puzzle is sizing. Here the Hub Framework gives you more direct control and asks you to returned the preferred view size for your component. Note that this is not necessarily the final size, as other factors such as the layout traits, the size of the screen, etc must also be taken into account before the final size is computed.
For our row, we’ll return that we’d prefer it to be the same width as its container, and 50 points tall:
- (CGSize)preferredViewSizeForDisplayingModel:(id<HUBComponentModel>)model
                            containerViewSize:(CGSize)containerViewSize
{
    return CGSizeMake(containerViewSize.width, 50);
}
Preparing the component’s view for reuse
To optimize views for maximum performance, both in terms of speed & memory - components are reused just the same way as cells in a UICollectionView or UITableView are reused. In fact, internally the Hub Framework uses a collection view to render all components, so the reuse system is really just a thin layer on top of the standard cell reuse mechanism.
In the prepareViewForReuse method on HUBComponent, you should clear up any state and get your component ready to be reused by another model. For our row component, the implementation is easy - just forward the call to the underlying UITableViewCell:
- (void)prepareViewForReuse
{
    UITableViewCell *cell = self.view;
    [cell prepareForReuse];
}
Finally, data binding
The last thing we need to implement before our row component is finished and ready to use - is data binding. We’ll be given a HUBComponentModel to bind to our view, and it’s up to us to pick and choose what data in the model makes sense for our component. In this case, we’ll use the title and subtitle and display them using our table view cell:
- (void)configureViewWithModel:(id<HUBComponentModel>)model
             containerViewSize:(CGSize)containerViewSize
{
    UITableViewCell *cell = self.view;
    cell.textLabel.text = model.title;
    cell.detailTextLabel.text = model.subtitle;
}
And with that, we’re done! We now have a fully reusable row component that we can not only use in the feature we’re building now, but anywhere in our app.
Creating a component factory
Next, we have to integrate our shiny new component into the Hub Framework. Just like for content operations - we use the factory pattern to create components. Component factories are created by implementing the HUBComponentFactory protocol, and also act as a way to cluster related components together. A component factory is given a name when it’s asked to create a component, and can either choose to return a component instance matching that name - or nil if the name was unrecognized.
@interface SPTCitiesComponentFactory : NSObject <HUBComponentFactory>

@end
@implementation SPTCitiesComponentFactory

- (nullable id<HUBComponent>)createComponentForName:(NSString *)name
{
    if ([name isEqualToString:@"row"]) {
        return [SPTCitiesRowComponent new];
    }

    return nil;
}

@end
Next up, we’ll register our new component factory using HUBComponentRegistry. Component factories are registered for a given namespace to avoid clashing with other factories. This enables you to quickly and safely build your own components - even if you’re working in a large team with several other developers.
HUBComponentRegistry is available on the application’s HUBManager instance, and one method call with make your new factory ready to use:
[componentRegistry registerComponentFactory:[SPTCitiesComponentFactory new]
                               forNamespace:@"cities"];
We’re using the namespace cities here (to match our feature identifier, for convenience - it’s not required) - which will make our row component usable through the component identifier cities:row. Let’s now start using our new component!
Using your new row component
To make the Hub Framework render our new component, we’ll jump back into our content operation and build a HUBComponentModel for it. We create component models through HUBComponentModelBuilder, which you can create instances of through the HUBViewModelBuilder that gets passed into your content operation:
id<HUBComponentModelBuilder> rowBuilder = [viewModelBuilder builderForBodyComponentModelWithIdentifier:@"row-0"];
We then need to assign the rowBuilder the componentNamespace and componentName that matches our row component - and we’ll give it a title and subtitle as well, making our content operation code look like this:
- (void)performForViewURI:(NSURL *)viewURI
              featureInfo:(id<HUBFeatureInfo>)featureInfo
        connectivityState:(HUBConnectivityState)connectivityState
         viewModelBuilder:(id<HUBViewModelBuilder>)viewModelBuilder
            previousError:(nullable NSError *)previousError
{
    viewModelBuilder.navigationBarTitle = featureInfo.title;

    id<HUBComponentModelBuilder> rowBuilder = [viewModelBuilder builderForBodyComponentModelWithIdentifier:@"row-0"];
    rowBuilder.componentNamespace = @"cities";
    rowBuilder.componentName = @"row";
    rowBuilder.title = @"Hello world!";
    rowBuilder.subtitle = @"This is my first component";

    [self.delegate contentOperationDidFinish:self];
}
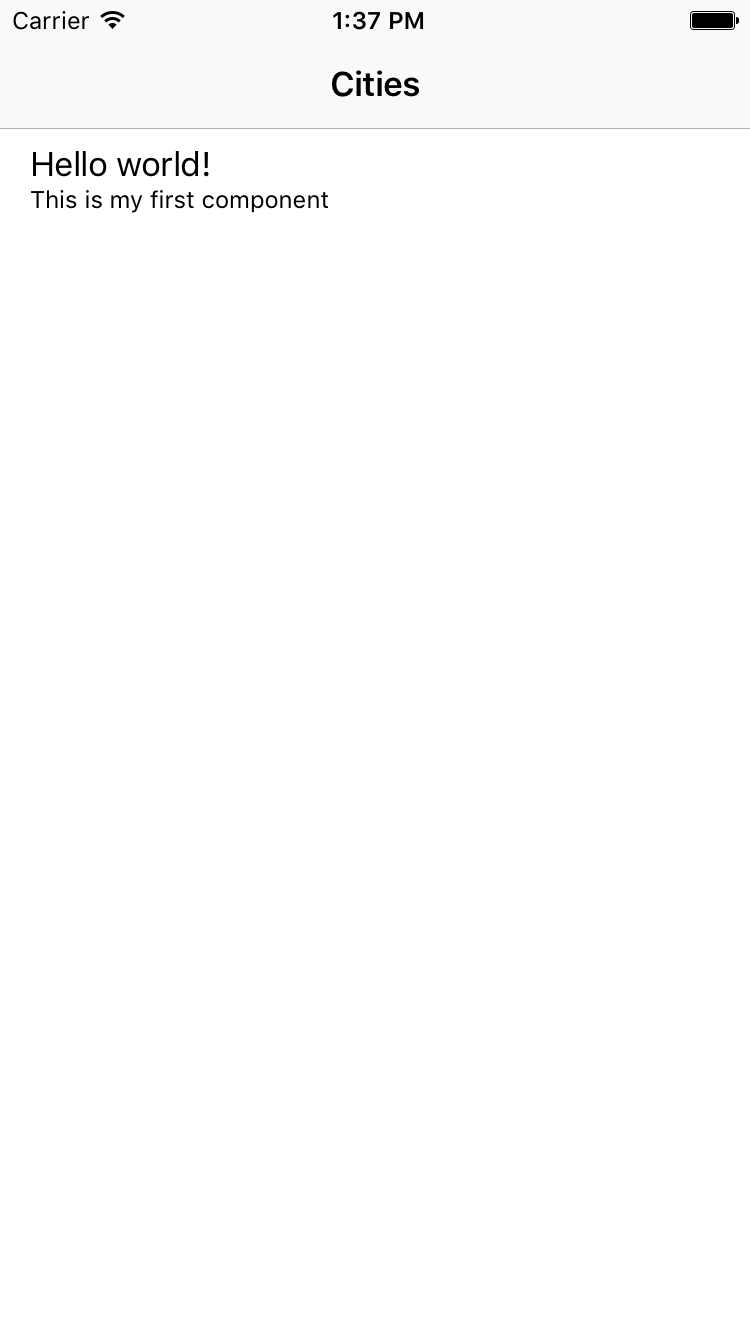
To see our new component in action, head back to your view like you did during the Opening the view section, and you should now see something like this:
Adding multiple row components to the view
Everyone enjoys a good Hello world!
moment, but it’s now time for us to add some real data to our view. Let’s add 4 capitals of Europe as our first list of cities. In this example we’ll use Madrid, Rome, Berlin and Amsterdam (but you can of course pick other cities if you prefer). For each of those cities, we’ll create a row component model with their name as the title and their country as the subtitle. So we’ll update our content operation code to look like this:
- (void)performForViewURI:(NSURL *)viewURI
              featureInfo:(id<HUBFeatureInfo>)featureInfo
        connectivityState:(HUBConnectivityState)connectivityState
         viewModelBuilder:(id<HUBViewModelBuilder>)viewModelBuilder
            previousError:(nullable NSError *)previousError
{
    viewModelBuilder.navigationBarTitle = featureInfo.title;

    NSArray *cities = @[@"Madrid", @"Rome", @"Berlin", @"Amsterdam"];

    NSDictionary *countries = @{
        @"Madrid": @"Spain",
        @"Rome": @"Italy",
        @"Berlin": @"Germany",
        @"Amsterdam": @"Netherlands"
    };

    for (NSString *city in cities) {
        NSString *identifier = [NSString stringWithFormat:@"city-%@", city];
        id<HUBComponentModelBuilder> rowBuilder = [viewModelBuilder builderForBodyComponentModelWithIdentifier:identifier];
        rowBuilder.componentNamespace = @"cities";
        rowBuilder.componentName = @"row";
        rowBuilder.title = city;
        rowBuilder.subtitle = countries[city];
    }

    [self.delegate contentOperationDidFinish:self];
}
If you go back to your view now, you should see this:

Creating an image component
If you go back to the top and look at the expected end result of this guide, you’ll see that we not only have rows, but also a grid of images. So let’s go ahead and create the component that we’ll use to render those.
The image component will be quite different from the row component, in that it won’t render any text, but rather an image that we’ll download over the network. Thankfully, the Hub Framework takes care of managing all image downloads for us (as long as it has been setup with an image loader), so we don’t have to write any actual networking code in our component.
Let’s start by creating basic implementations of the HUBComponent methods, just as we did for the row component above. Only this time we’ll use the compactWidth layout trait, and we’ll make our image take up only part of the width of the screen.
@interface SPTCitiesImageComponent : NSObject <HUBComponent>

@end
@implementation SPTCitiesImageComponent

@synthesize view = _view;

- (NSSet<HUBComponentLayoutTrait *> *)layoutTraits
{
    return [NSSet setWithObject:HUBComponentLayoutTraitCompactWidth];
}

- (void)loadView
{
    self.view = [UIImageView new];
    self.view.backgroundColor = [UIColor grayColor];
}

- (CGSize)preferredViewSizeForDisplayingModel:(id<HUBComponentModel>)model
                            containerViewSize:(CGSize)containerViewSize
{
    CGFloat margin = 15;
    CGFloat width = floor((containerViewSize.width - margin * 3) / 2);
    return CGSizeMake(width, floor(width * 0.7));
}

- (void)prepareViewForReuse
{
    UIImageView *imageView = self.view;
    imageView.image = nil;
}

- (void)configureViewWithModel:(id<HUBComponentModel>)model
             containerViewSize:(CGSize)containerViewSize
{
    // We don't have anything to do here, since we need to wait for our image to be downloaded
}

@end
Adding image handling support
To make our component able to handle images, we’ll conform to an extension of the base HUBComponent protocol - HUBComponentWithImageHandling. So we’ll change the @interface for our image component to look like this:
@interface SPTCitiesImageComponent : NSObject <HUBComponentWithImageHandling>

@end
This requires us to implement 2 new methods. One that lets the Hub Framework know what size we would prefer that our image gets downloaded as, and one that lets us update the component’s view once an image has been downloaded. Let’s add them:
- (CGSize)preferredSizeForImageFromData:(id<HUBComponentImageData>)imageData
                                  model:(id<HUBComponentModel>)model
                      containerViewSize:(CGSize)containerViewSize
{
    // Since we want the image to cover the entire component, we just call our view size calculation method here
    return [self preferredViewSizeForDisplayingModel:model
                                   containerViewSize:containerViewSize];
}

- (void)updateViewForLoadedImage:(UIImage *)image
                        fromData:(id<HUBComponentImageData>)imageData
                           model:(id<HUBComponentModel>)model
                        animated:(BOOL)animated
{
    // We'll skip animations for now, to keep things simple
    UIImageView *imageView = self.view;
    imageView.image = image;
}
Updating the component factory
Now that we’ve created our image component, we’ll update our component factory to take it into account - using the name image:
@implementation SPTCitiesComponentFactory

- (nullable id<HUBComponent>)createComponentForName:(NSString *)name
{
    if ([name isEqualToString:@"row"]) {
        return [SPTCitiesRowComponent new];
    }

    if ([name isEqualToString:@"image"]) {
        return [SPTCitiesImageComponent new];
    }

    return nil;
}

@end
Adding image components through JSON
For the models for our image components, we’ll use JSON. We could’ve of course just added image content through code, just like we did for the row components - but this is a perfect opportunity to learn about how component models can be added through JSON - as well as content operation chaining.
Creating a new content operation
The best practice for content is to separate content loading into multiple content operations when those operations all perform a different task. In this case, we’ll have one operation (our SPTCitiesContentOperation from earlier) that adds city names through code, and one (the one we’re about to create) that will add image content through JSON.
Let’s create our new content operation, that will use a local JSON file bundled with the application:
@interface SPTCitiesImageContentOperation <HUBContentOperation>

@synthesize delegate = _delegate;

@end
@implementation SPTCitiesImageContentOperation

- (void)performForViewURI:(NSURL *)viewURI
              featureInfo:(id<HUBFeatureInfo>)featureInfo
        connectivityState:(HUBConnectivityState)connectivityState
         viewModelBuilder:(id<HUBViewModelBuilder>)viewModelBuilder
            previousError:(nullable NSError *)previousError
{
    NSURL *jsonURL = [[NSBundle mainBundle] URLForResource:@"city-images" withExtension:@"json"];
    NSData *jsonData = [NSData dataWithContentsOfURL:jsonURL];
    [viewModelBuilder addJSONData:jsonData];

    [self.delegate contentOperationDidFinish:self];
}

@end
As you can see above, the Hub Framework comes with built-in JSON handling, and can parse JSON data directly for you. The framework ships with a default JSON schema (that we’ll use for this guide), but you can also define your own.
To read about how JSON works in the Hub Framework, check out the JSON programming guide, which also includes a reference for the default JSON schema.
Creating the JSON file
Next up, let’s add a local JSON file to our app called city-images.json with the following content:
{
    "body": [
        {
            "component": {
                "id": "cities:image"
            },
            "id": "image-0",
            "images": {
                "background": {
                    "uri": "https://spotify.github.io/HubFramework/resources/getting-started-tokyo.jpg"
                }
            }
        },
        {
            "component": {
                "id": "cities:image"
            },
            "id": "image-1",
            "images": {
                "background": {
                    "uri": "https://spotify.github.io/HubFramework/resources/getting-started-gothenburg.jpg"
                }
            }
        },
        {
            "component": {
                "id": "cities:image"
            },
            "id": "image-2",
            "images": {
                "background": {
                    "uri": "https://spotify.github.io/HubFramework/resources/getting-started-zurich.jpg"
                }
            }
        },
        {
            "component": {
                "id": "cities:image"
            },
            "id": "image-3",
            "images": {
                "background": {
                    "uri": "https://spotify.github.io/HubFramework/resources/getting-started-kiev.jpg"
                }
            }
        }
    ]
}
The JSON above specifies that we want to add 4 body components that use our new cities:image component, all with a remote background image. Note that the content that we added in our previous SPTCitiesContentOperation won’t be overridden, instead both content operations will add component models to the same HUBViewModelBuilder.
Updating the content operation factory
We’re now finished with our second content operation, and we’re ready to integrate it into our content loading chain. To do that, we’ll add it to the array of content operations that our content operation factory returns.
The order of the returned array determines the loading order. In our case it doesn’t really matter, since both of our content operations deal with separate component models - but if you wanted to continuously mutate a component model throughout different operations - the order will probably matter.
This is what our content operation factory looks like after the update:
@implementation SPTCitiesContentOperationFactory

- (NSArray<id<HUBContentOperation>> *)createContentOperationsForViewURI:(NSURL *)viewURI
{
    return @[
        [SPTCitiesContentOperation new],
        [SPTCitiesImageContentOperation new]
    ];
}

@end
The final view
With that, we have our final view. Open your view again and you’ll now be able to see the final result:
We hope this guide helped you gain some basic understanding of the core concepts of the Hub Framework; components & content operations. However, this only scratches the surface of what you can do with the framework - so for more information - make sure you read through all the programming guides as well as refer to the class & symbol documentation available throughout the framework.
We can’t wait to see what you’ll build using the Hub Framework!